⚠️ This article was written in and last updated in so may contain some out of date information.
Let's start really simple: what is git? Git is the most popular Source Control Management (SCM) system. It can ensure your code is backed up, versioned and accessible to other developers. Used properly, however, it can be so much more - helping ease complex processes such as release management, feature development and multiple people working concurrently.
I can, though, be a bit of a git about it: I'm really fussy about how people use git - and that's a good thing. I've worked with a fair few organisations and development teams over the years, and poor git utilisation is a more common issue than you might think. People use git as a dumping ground for code rather than a well-managed archive of software. Today we'll take a look at 5 simple tips which will, with any luck, improve your git practice.
0. Source Control yourselves
Why did the developer not want to use git?
— Lou (@lovelacecoding) August 30, 2021
They were scared of committing to it
This isn't one of the 5, but there are seriously some organisations out there not using SCM yet. SCM is not the same as a backup and if you've emailed some code to a colleague, you're probably doing it wrong!
For all the reasons I gave previously, SCM is essential for modern day software development.
Mercurial (hg), Team Foundation Version Control (TFVC) and Subversion (SVN) are all examples of SCMs but Git has really taken over in the software world and is the industry standard - I'd recommend it for that on its own: there's no point teaching your team a SCM system which is (or may become) redundant.
As for git clients, there are so many out there. Some like to use the command line - and that's great... if you're a git pro! But why overcomplicate? And there are times when being able to visualise the commit history in tree form can be a life-saver even for confident git-users. My favourite tree visualisation (and therefore favourite overall git client) is GitKraken (this is a referral link - I want a GitKraken t-shirt!). It's free for open source projects, but you'll need to pay for private repositories. I'll be using GitKraken for examples in this article as it's the client I'm most familiar with - but you can use any client you like but I'd strongly recommend not using a stripped-back client such as Visual Studio or GitHub Desktop as you get into more complex git usage and processes. If GitKraken isn't your bag, you may want to investigate Fork (also paid, available for Mac and Windows), Git Extensions or, at the very least, Oh My Posh and Windows Terminal.
1. Commit Messaging is everything
This xkcd comic highlights the problem perfectly.
I'd like to say that was just a joke in a comic strip, but it can be all too real...
Investigating an issue and by scanning through useful commit messages in git history.. 😫 pic.twitter.com/lVeopRoDJg
— Dennis Adolfi (@dadolfi) June 17, 2021
Imagine being in Dennis' situation and:
- you've discovered a bug and you can't find the commit where it likely happened
- you see something odd in the codebase, there's no comment so you use a blame/annotate tool to see who changed it and why... but Andy is on holiday and his commit message says "test" 😱
- some piece of code has changed since you last saw it - why? You could revert it back to how you like it but maybe it was changed for a reason? You fire up the blame tool again, "Fixes date formatting issue in Chrome" - better leave it as it is! Saved by a good commit message!
Some people will tell you that good commit messages should be written as if answering the question "what does this commit do?" and that's good advice! Starting your commit message with a verb like "Fixes ...", "Reverts ..." or "Integrates ..." is a good practice too.
But these alone are not enough. "Fixes bugs" or "Reverts broken changes" are still useless. Detail, detail, detail!
GitKraken (and many other GUI git clients) give you two fields for your commit messages - a title and a description. It's best to keep your title short (GitKraken recommends 72 characters) but you can add even more detail in the description field.
You can even do this on the command line: git commit -m "Title" -m "Description"
Fixes date formatting issue in Chrome
Chrome always assumes the MM/DD format no matter what locale the browser is set to*
Reverts new "Paytastic Checkout" checkout flow
Customer has changed their mind and wants to revert to using LegacyCart
Integrates SMS API
Sending an SMS to customers when their order ships using the "Simple SMS Sender" API
If you have a ticketing system or to-do list, it sometimes helps to include the title of the item in your commit and an ID or link to the initial issue can prove very useful.
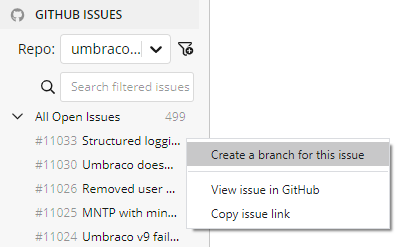
GitKraken (and many other GUI git clients) let you hook up your issue tracker to your git repos so you can automatically stick an issue number into the branch name (and it'll therefore be in the merge commit too!)

2. Push Little and often
I've seen a lot of different tactics when it comes to how often people commit, but the most persuasive argument I've heard is for "little and often". Don't forget git acts as a backup of your work and progress. There's no point only committing when something is feature complete: what happens if your hard drive packs up overnight? Or you're off sick tomorrow and somebody else is left to pick up your work? It's far more useful to have partially complete work committed than not. Although it's generally good practice to ensure each commit is in a buildable state - it's ok if your work-in-progress (WIP) commits don't build.
You can also use your tiny commits to help you revert unwanted pieces of functionality, while it can be a real pain to pull small chunks of code out of a bigger commit.
Perhaps changing the colour-scheme to green text on a red background was a bit much...? It would have been all too easy to bundle "Change colour-scheme to green on red" in with "Reorder slides", but separating these out made it a lot easier to revert one of them at a later date.
3. Squash rackets
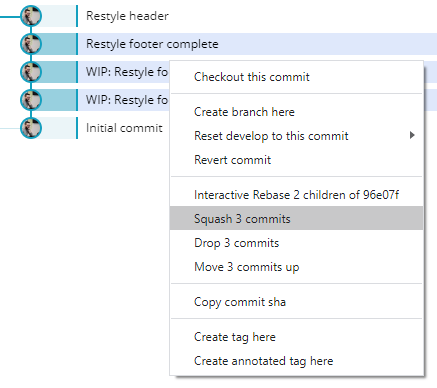
But don't all these "little and often" commits start to make a racket after a while? (See what I did there?) That's where squash and amend come in. As I mentioned, I'm a big fan of a WIP (Work -In-Progress) commit at the end of the day. But, come tomorrow morning and I've finished that small segment of work off, I don't want two commits "WIP - Restyle footer" and "Restyle footer". So I can amend my "WIP" commit to include all changes and rename it to "Restyle footer".

Or in the command line git commit --amend -m "Restyle footer". Atlassian has a great tutorial about rewriting git history from the command line.
If you want to combine multiple commits, or you've already committed your second round of changes, you can look into "squashing" the commits.

In GitKraken, this is done by selecting the multiple commits you want to combine, right clicking and selecting "Squash". There are some scenarios when squashing won't be available - in this case you might be best just leaving the history as-is!
If I'm doing some DIY at home, things can get pretty messy with tools and dirt around the place. Before I go to bed, I might do a quick tidy up but the next day, once I've finished the piece of work, all the tools go away and I vacuum up the mess I made. I'll definitely have it clean and tidy before I let anybody else in the house! Treat your branches the same way. It's OK for them to be a bit messy while you've got things in progress, but as soon as you're finished or ready to merge into a shared branch, you ought to tidy it up - nobody wants to see your messy branch!
One thing to note, though: don't squash your mistakes! Your mistakes and reworkings tell a story. It could provide valuable explanation to a future developer and documents your mistakes and learnings. Use amend and squash to tidy up, not to sweep under the rug!
4. A branching Strategy is key
There are many branching strategies out there and I don't really mind which one you use. My personal favourites are GitHub flow and Common Flow (or a combination of the two) but there are many more. Generally, these follow the feature-driven development pattern, with a branch for each feature and some notion of the state of a particular release (generally using branches or tags).
I also like to ensure only one person is committing to any single branch at one time - if two people are working on a feature, break that feature down into sub-features. This is the only way my "messy work-in-progress branch" method works!
GitHub flow, put very simply involves creating a branch for your feature (mapped to a GitHub issue), adding your commits to that branch and then opening a Pull Request. You discuss and review your code changes with your colleagues before deploying your changes for test. Once everyone is happy, your Pull Request is merged into the main branch. The GitHub flow tutorial goes into a little more detail.
It's worth noting that if none of these git flows make sense to you, you can take inspiration from them. I don't know of many companies who strictly follow any one particular strategy. So pick one as a baseline and adapt it for your organisation.
5. Rebase and merge - the best of both worlds!
Alright, so you've got your branching strategy and you've completed your feature - we're ready to merge!
But on larger projects with multiple concurrent workflows, you can end up with a real tangle of branches and merges.
So what other options are there for merging these features?

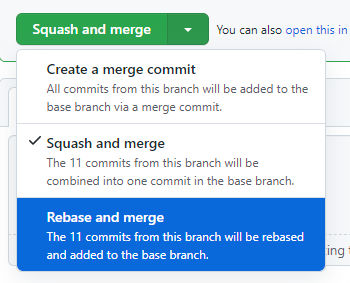
GitHub provides these 3 options on completion of a Pull Request:
- Create a merge commit (which creates the mess you see above)
- Squash and merge
- Rebase and merge
Now, some people like to squash and rebase: your entire feature gets squashed into one commit and plopped straight onto the develop or main branch -it's kind of an extreme alternative to GitHub's "squash and merge". This is very neat and tidy, I'll give you that! However, you lose a lot of the documentation of when, how and why code changes were made. I'd much rather keep this history where we can.
Which leaves us with "Rebase and merge". This option allows us to avoid losing data while keeping the tree clean and tidy so is, of course, my favourite. (If you're using Azure DevOps, you can set this method as the merge type too - they call it a "semi-linear merge").
Rebasing is the act of "replaying" each commit in a branch (our feature branch) on top of the target branch (main or develop in this case) as if they were happening at this newer point in time.
As you can see, this method removes the muddle of criss-crossing merges, while maintaining the whole branch structure and all the detail in every commit. Each feature makes a neat "D" shape with the main or develop branch, with no crossovers.
You can also enact this process without a Pull Request utilising the individual tools rebase your feature onto main and then merge your feature into main in any git client of your choosing.
A note on rewriting history
Both tips 4 and 5 do something controversial in the git world: rewriting history. Not "rewriting history" as in the act of whitewashing a historical atrocity, but simply changing what's been pushed to the git repository (AKA history) after its happened (rewriting). Squashing, amending, rebasing and patching are all examples of git history being rewritten.
And I've just been actively advocating for 3 of these!
Maintaining your "true history" certainly has its merits: it can be useful for learning and code reviews. It's also impossible to mess up your history if you never tamper with it!
However, the way I see it is that this shouldn't at the cost of the readability of your repo. I prefer to maintain what I like to call my "feature history" where the order of our feature development is true, even if we're tweaking the timelines a little of when each feature was developed relative to each other.
I don't advocate for complete rewriting, just a quick tidy up.
As for that "risk" I mention when rewriting history, just make sure you've pushed your repository before you start messing with history. Then double check before your force push.
From code dump to stunning archive of software
And that's it. That's our stunning archive of software. We're source controlled with small incremental commits, each having a meaningful and detailed commit message sat comfortably in feature branches with no distracting noise and complicated merges. It reads easily from bottom to top, with no detail hidden or mistakes masked.
A clean history allows for features to be rolled back easily, while detailed commit messages create a better understanding of a repositories history leading to fewer mistakes and a branching strategy can clarify what code is deployed to which environment at any point in time. It's now plain to see how git discipline can provide benefits to developers, managers and the end client - saving time, frustration and money for all involved in a project.


