⚠️ This article was written in and last updated in so may contain some out of date information.
⚠️ Since these filters use native AngularJS functionality, they do not apply to v14+. Replacement functionality exists in v14.1 and up.
When you're configuring a block type in a block list or block grid, you're provided with a "Label" field. Similarly, custom columns in your list views have a "Template". You can just type some plain text in here, but using Angular templates is where it really shines.
For example, if you want to pull up the value of a field called "Heading" (alias heading) from the block list item into the name, you can do that by simply wrapping the alias of the property in double-curly braces: {{ heading }}. You can even include fixed text around it: A text block with the heading '{{heading}}' (but maybe less wordy, eh?)
As for custom list views, the only additional thing you need to know is that instead of using the property alias in the template, you use the value variable e.g. {{ value.join(", ") }}
For properties that aren't as simple as a textbox, we can do that too with the help of these filters:
Node picker / Media Picker v2
ncNodeName will pull back the name for a node selected in a node picker (although this can be a little buggy)
e.g. Call to Action: {{ page | ncNodeName }} becomes Call to Action: Contact us
Media Picker v3 (even in single mode)
For Media Picker v2, this is the same as above, the ncNodeName filter works just fine.
However, for v3 we have a couple of alternatives.
In v11+, use the mediaItemResolver to get the media object using the key:
e.g. {{(image[0].mediaKey | mediaItemResolver).name}}
Or (for older versions, or if you just like it better) we can use the ncNodeName filter if we construct our own UDI:
e.g. {{ "umb://media/" + image[0].mediaKey | ncNodeName }}
Rich Text editor
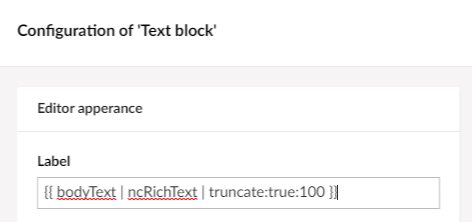
ncRichText strips out the HTML markup and just renders the inner text. This is useful for rendering text from a Rich text editor.
e.g.Text module: {{ bodyText | ncRichText }} becomes Text module: This is some text from a rich text editor.
In v13, you'll also need to reference the markup property to access the contents:
e.g. Text module: {{ bodyText.markup | ncRichText }}
Multi-Url Picker (even in single mode)
Simply navigate to the child properties like so: link[0].name
e.g. Call to Action: {{ link[0].name }} becomes Call to Action: Make an enquiry
Yes/No
Checkboxes store their value as a numeric, so we can use the value to render some text: checkboxPickerAlias == 1 ? 'Yes' : 'No'
e.g. Text with image ({{ flipped == 1 ? "Image right" : "Image left" }}) becomes Text with image (Image right)
Too long?
We've got a few options for truncating text.
Angular's default limitTo:n (where n is the number of characters) will simply cut the text short after so many characters.
If we want to get fancy, we can use Umbraco's truncate function. It takes 3 parameters: wordwise (don't truncate in the middle of a word), the number of characters to truncate and finally an optional string to append to any truncated text (e.g. …, which is the default).
e.g. Text module: {{ bodyText.markup | ncRichText | truncate:true:35 }}* becomes Text module: This is some text from a rich text…
These last two parameters are swapped in v7 (truncate:35:true).
We can also limit to a number of words using umbWordLimit, but without all the functionality of truncate.
e.g. Text module: {{ bodyText.markup | ncRichText | umbWordLimit:4 }}* becomes Text module: This is some text
* See Rich Text editor section
What about settings?
Block list settings are made available using the $settings property.
e.g. Text with image ({{ $settings.flipped == 1 ? "Image right" : "Image left" }}) becomes Text with image (Image right)
Messing with the default
By default, the block displays the name of the block type. If we want to use that in our custom templates we can use $contentTypeName.
e.g. {{$contentTypeName}} ({{ $settings.flipped == 1 ? "Image right" : "Image left" }}) becomes Text with image block (Image right)
How do I look?
In the Block Grid, we can also access the column span and row span of the block using the $layout property and it's values $layout.rowSpan and $layout.columnSpan.
e.g. {{$contentTypeName}} ({{$layout.columnSpan == 12 ? "full width" : "half width"}}) might become Heading block (full-width)
Arrays
Umbraco provides a filter for joining arrays of strings or objects.
e.g. Things: {{ myArray | umbCmsJoinArray:', ' }} becomes Things: Thing 1, Thing 2, Cat (in hat)
When applying to an array of objects, a second parameter can be provided to specify which property to used for joining.
e.g. Things: {{ repeatableTextStrings | umbCmsJoinArray:', ':'value' }} becomes Things: Thing 1, Thing 2, Cat (in hat)
Nesting block lists?
Block lists within your block can be accessed by using the name of the block list property followed by contentData.
e.g. Tab panel ({{ tabs.contentData.length }} tabs) becomes Tab panel (5 tabs)
Since this is just an array, we can also take advantage of the umbCmsJoinArray filter here!
Things: {{ things.contentData | umbCmsJoinArray:', ':'title' }} becomes Things: Thing 1, Thing 2, Cat (in hat)
$index
The $index field can be used in block lists and nested content. Perhaps confusingly, this is a 1-based index.
e.g. {{ $index }}. {{ heading }} becomes 1. Thing
Regular ol' JS
Some basic regular JS can be used too. But bear in mind you can't do complex things like writing functions (not even arrow functions, sorry!) This will require writing your own filters (see below).
e.g. Things: {{ repeatableTextStrings.join(", ") }} becomes Things: Thing 1, Thing 2, Cat (in hat)
Although this particular example would be best solved using the existing umbCmsJoinArray filter (see above).
See also "Fallbacks" and "Messing with the default".
Fallbacks
Since we can run regular JS, we can use the truthiness of a statement to fall back to another value.
e.g. {{ heading || tabs.contentData | umbCmsJoinArray:', ':'heading'}} will be the value of the optional heading field, otherwise it will list all the headings of the child tabs.
Writing your own
Writing your own is possible too. Simply create a plugin folder in App_Plugins with a JS file for the new filter.
Here's an example taking the umbCmsJoinArray even further:
angular.module("umbraco.filters").filter("blockSummary", function () {
  return function (input, fieldAlias, maxItems, showMore, separator) {
    var items = input.contentData;
    var more = "";

    if (maxItems > 0) {
      var total = items.length;
      items = items.slice(0, maxItems);
      var moreCount = total - maxItems;

      if (showMore !== false && moreCount > 0) {
        more = ` + ${moreCount} more`;
      }
    }

    return items.map(i => i[fieldAlias]).join(separator || ", ") + more;
  }
});
You'll also need to create a package.manifest file:
    {
        "name": "MyFilters",
        "version": "1.0.0",
        "allowPackageTelemetry": false,
        "javascript": [
            "/App_Plugins/MyFilters/blockSummary.filter.js"
        ]
    }
It's used as below:
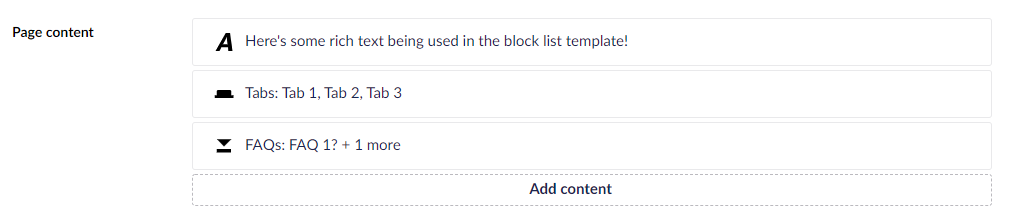
Things: {{ things | blockSummary:'title' }} becomes Things: Thing 1, Thing 2, Cat (in hat)
Although this particular example would be best solved using the existing umbCmsJoinArray filter (see above), the following take better advantage of this custom method:
Tabs: {{ tabs | blockSummary:'heading':0:false:' / ' }} becomes Tabs: Umbraco development / .NET development / Front-end builds
FAQs: {{ items | blockSummary:'question':1 }} becomes FAQs: How did I get here? + 2 more
Further reading
Some of this is covered in the Block Editor Label Properties documentation (this is targeted at v9+ which may differ from functionality in older versions, docs for these are covered in: Block Editors for < v9 and Nested Content for < v9) and the source code for the Umbraco filters can be found on GitHub.
Paul Seal covers using Block List editors in his Umbraco 10 series from episode 9 onwards.
Thanks to Bjarne Fyrstenborg, Callum Whyte, Dean Leigh, Richard Jackson, Erica Quessenberry and Lee Kelleher for keeping me up to date on this one.